Installation
2 Installing iCL Portal (single server)
The following sections describe the installation process for all required components of the iCL System. It is recommended to install the components in the order of this manual.
2.1 Installing the back-end
Install all required software as listed in 1.4
Create a new database for iCL Portal in SQL Management Studio
Run the following script to ensure, that Snapshot Isolation is enabled on the database
   DECLARE @databaseName sysname;
   SET @databaseName = (SELECT db_name());
   DECLARE @SQL varchar(1000);
   SET @SQL = 'IF EXISTS (SELECT NAME FROM sys.databases where NAME = N'''+@databaseName+''' AND [snapshot_isolation_state] = 0)
   BEGIN
       ALTER DATABASE ['+@databaseName+'] SET ALLOW_SNAPSHOT_ISOLATION ON
       ALTER DATABASE ['+@databaseName+'] SET READ_COMMITTED_SNAPSHOT ON WITH ROLLBACK IMMEDIATE
   END'
   Exec (@SQL)
Note the connection string to the database.
2.2 Installing the web front-end
Install all required software as listed in 1.4
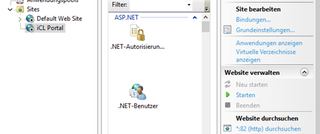
Create a new IIS Web-Site

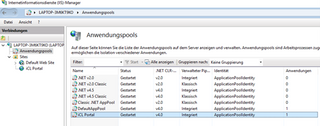
Make sure that the application pool that was created for this site runs .NET 4.0
Copy all files from the web-frontend folder into the root folder of your website. In this example this would be:
c:\inetpub\icl_portal.In this screenshot you can see the two important configuration files for adapting the iCL Portal web-frontend: the NLog.config and the Web.config file.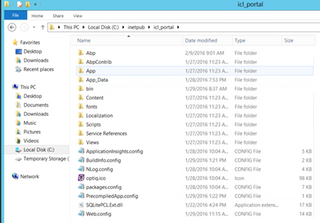
Make sure that the user that runs the application pool has full access to the
App_Datafolder as this is the default location for storing all files and logs.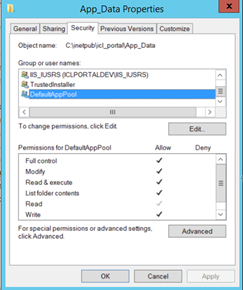
For this, find out the name application pool that iCL Portal runs on. In this example iClPortalAppPool. Then open the security settings of the
App_Datafolder and add the application pool user with full access. As username, useIIS AppPool\apppoolname, soIIS AppPool\iClPortalAppPoolin this example. Do not click on search or check names as these will not find this special user!
Stop the website so you can configure the portal for the first start:
Configure the bindings of the web front-end and make sure that there exists an HTTPS binding that is secured with a trusted certificate.
noteIn production environments, only HTTPS connections are supported as the system might be compromised otherwise!
noteIf you created a separate database for the background job storage, make sure that on the server that runs the iCL Portal web front-end, the service
Distributed Transaction Coordinatoris running and has the starttypeAutomatic: note
noteThe default web.config of iCL Portal comes with a default machineKey which is used to encrypt tokens for email-verification and password recovery. This machineKey must be the same on all web front-ends! We strongly encourage you to create your own machine keys. For a manuall, see here.

2.3 Configuring web front-end
The fundamental configuration of the iCL Portal Web Front-end is done by editing the Web.config.
If you start out with a clean install, download Web.config template from here Copy the file into the root folder of iCL Portal and rename it to Web.config.
Open Web.config in your favorite text editor and navigate to the <appSettings> element. This node contains all relevant configuration options.
2.3.1 Configure your icl portal key
Search for the element with the key License.Key and specify there the license key, that you got when you purchased iCL Portal:
<add key="License.Key" value="" />
2.3.2 Configure connection to sql server database:
iCL Portal has two logically separate databases whose connections can be specified in the <connectionStrings> element:
<connectionStrings>
    <add name="Default" connectionString="Data Source=SERVERNAME\INSTANCENAME;Initial Catalog=DATABASENAME;Integrated Security=True" providerName="System.Data.SqlClient" />
  </connectionStrings>`
The Default connection is the one that stores all relational data of the iCL System.
For single server installations, ensure that you create a login for the application pool user.
Add a login for the user IIS AppPool\apppoolname - in our example: IIS AppPool\iClPortalAppPool
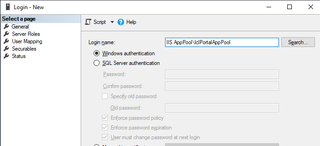
Do not click search as this will resolve an invalid user!
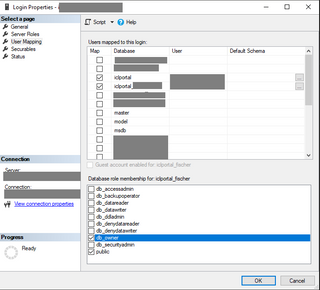
iCL Portal manages the schema of the database and migrations itself. On the first start, it will try to create all required tables, views, stored procedures, etc. Therefore it requires db_owner permissions for both databases!
The connectionString attribute requires a ADO.NET connection string. The following example shows the configuration with a database Portal on a named MSSQL Instance SQLSERVER on a machine called SQL using integrated security.
<connectionStrings>
    <add name="Default" connectionString="Data Source=SQL\SQLSERVER;Initial Catalog =Portal; Integrated Security=True;" providerName="System.Data.SqlClient" />
  </connectionStrings>
The following example uses SQL server security with USERNAME and PASSWORD.
<connectionStrings>
    <add name="Default" connectionString="Data Source=SQL\SQLSERVER;Initial Catalog =Portal; User ID=USERNAME;Password=PASSWORD;" providerName="System.Data.SqlClient" />
  </connectionStrings>
The following example specifies a non-default port 1234.
<connectionStrings>
    <add name="Default" connectionString="Data Source=SQL\SQLSERVER,1234;Initial Catalog =Portal; User ID=USERNAME;Password=PASSWORD;" providerName="System.Data.SqlClient" />
  </connectionStrings>
2.3.3 Configure file storage
By default, iCL Portal stores all files in its APP_DATA folder. To change this setting,
- find the configuration element with the key
FileBlobStorageRoot:
<add key="FileBlobStorageRoot" value="~/App_Data" />
- Specify data-folder that will contain all files like reports, workbooks, pictures, etc. This can of course be a network path. E.g.:
<add key="FileBlobStorageRoot" value="\\FILESERVER\ICLPortalFiles" />
- Make sure that the user that runs the application pool has full access to this folder
2.3.4 Configure smtp server
iCL Portal Web front-end uses the SMTP server for sending mails for password recovery and account confirmation.
Reports, however, are being sent by the dox42 Server directly.
By default, iCL Portal expects the SMTP server to be running locally on a web front-end on port 25.
In order to change this, open the web.config and find the <mailSettings> element.
<system.net>
    <mailSettings>
      <smtp deliveryMethod="Network" from=`noreply@iclportal.com`>
        <network host="localhost" port="25" defaultCredentials="true" />
      </smtp>
    </mailSettings>
  </system.net>
The following example shows how to provide username and password and specify a default from-address and enable SSL encryption:
<system.net>
    <mailSettings>
      <smtp deliveryMethod="Network" from="noreply@mycorp.com">
        <network defaultCredentials="false" host="smtp.mycorp.com" port="587" userName="mailuser@mycorp.com" password="somepassword" enableSsl=`true`/>
      </smtp>
    </mailSettings>
  </system.net>
The syntax of the network element as documented here
<network
  clientDomain="string"
  defaultCredentials="true|false"
  enableSsl="true|false"
  host="string"
  password="string"
  port="integer"
  targetName="string"
  userName="string"
/>
2.3.5 Remote diagnostics
iCL Portal has remote diagnostics enabled by default. These send non-confidential informations such as occurred exceptions and stack traces to a central service hosted by Opti-Q.
Therefore configure the firewall of the iCL Portal Web-frontend to allow outgoing connections on port 443. Otherwise we will not receive any diagnostic information.
The setting with key iKey in the <appSettings> element contains the api key required to access this service.
Do not change the iKey unless advised so by an Opti-Q staff member, otherwise we cannot provide full support.
Also, there exists an additional element <applicationinsights.tags> which contains additional metadata that is transmitted to our service to be able to identify our customer and the environment (dev/staging/production)
 <applicationinsights.tags>
    <add key="customer" value="yourcompanyname" />
    <add key="environment" value="production" />
    </applicationinsights.tags>
2.3.6 Configure logging by editing nlog.config
iCL Portal uses NLog to log diagnostics information to the local file system. This logging mechanism is buffered to ensure a minimum performance impact so do not expect log messages to appear instantly. By default, logfiles are written to the web front-ends APP_DATA folder.
If you do not yet have an NLog.config file in your web front-end create an NLog.config file with these contents in the root folder of iCL Portal.
To change logging, NLog.config in your favorite text editor
- By default, Nlog is creating its logs files in the local App_Data folder. To change this, edit the paths that start with
${basedir}\App_Datato point to your desired folder location. Note that absolute paths are also supported.noteChanges of the NLog.config should take effect almost immediately. Do not recycle the application pool or restart IIS!
- By default, NLog is configured to log only messages on WARN level. If you want to configure a more verbose logging, open the NLog.config and change the following line
<logger name="*" minlevel="Warn" writeTo="Trace" />
to
<logger name="*" minlevel="Debug" writeTo="Trace" />
2.3.7 Configuring additional plugins
iCL Portal allows to create plugins to integrate with your corporate systems. In case we developed a plugin for you, you will get a separate package with installation instructions.
These most of the time only consist of copying some additional dlls into the bin directory of your iCL Portal web front-ends and adding another appSettings element to your Web.config.
2.3.8 Start the icl portal website
Once all configuration is done, start up the iCL Portal website and finish last couple of configuration steps with your favorite browser.
2.3.9 System/Host configuration
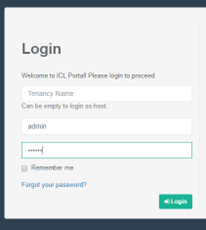
iCL Portal supports multi tenancy. To manage tenants, you need to login as host admin. During the setup, a single host admin - which belongs to no tenant - is created with a default password. To secure your system, it is absolutely necessary to login with this user and change his password.
To do this, login by leaving the tenant textbox empty and use the username admin with the default password 123qwe

Logged in as host admin, you have to configure the iCL Portal license key. To do this, navigate to settings and in the category "general" you will find the license id textbox:

Enter the license key (e.g.: 327d75a8-64b5-49ac-bf90-2544229dbeca) that you got from Opti-Q and click on save.
2.3.10 Create tenant
iCL Portal supports having multiple tenants, each with its completely isolated environment. To run the portal, a default tenant is required.
To do so, navigate to Settings/Tenants and click CREATE to create a new one. Make sure, that the tenancy name only consists of letters, then hit CREATE again
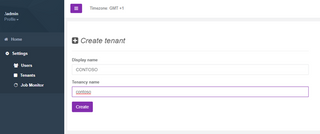
Then, a new tenant will be created for you with a default administrator for this tenant. This may take a minute or two.
2.3.11 Configuring the new tenant
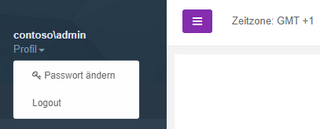
To login to this tenant, first logout as host admin in the upper right corner
and navigate back to the login screen
At the Login screen, login using the tenancy name you just created (contoso in this example) the username admin and the default password 123qwe

Once logged in, immediately change this password to a strong one using the menu in the upper left corner:
Thereafter, you can go to
SETTINGS/USERSand create as many users for this tenant as you like.
Finally upload your license files in SETTINGS/LICENSES by dragging and dropping the files into the list one by one

2.4 Configure the Azure Entra ID integration (optional)
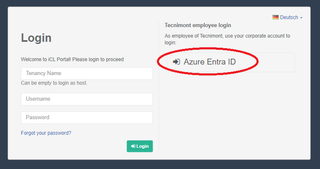
While iCL Portal can handle authentication itself using OAuth 2.0 bearer token authentication, you can add additional authentication providers. The first officially supported one being WS Federation. This allows your users to login using one click, instead of typing in their passwords.
Once you configured the Azure Entra ID integration correctly, users will see it listed as external login provider:
Under the hood, iCL Portal will only authenticate the user using Azure Entra ID. As soon as Azure Entra ID redirects the user back to iCL Portal a new user will be created in the database and is assigned the default role that you defined. For the iCL Portal administrator that assigns users to roles and teams, users coming from Azure Entra ID will look identical to users coming from iCL Portal and they are also handled the same way.
2.4.1 Creating an app registration in Azure Portal
To set up Azure Entra ID as external authentication provider, we first must tell Azure Entra ID, that our iCL Portal application exists and is allowed to use Azure Entra ID to authenticate users.
For this, go to https://portal.azure.com/#blade/Microsoft_AAD_IAM/ActiveDirectoryMenuBlade/RegisteredApps and create new app registration.
For the sake of giving an example, we will configure an app registration using the FQDN of our test system: https://testportal.opti-q.com/callback/login/microsoft (Replace this with the FQDN of your iCL Portal installation) and ensure that you add /callback/login/microsoft at the end.

Once that is done, opent he app registration and copy the client-id, tenant-id and a client secret (you will have to create a new client secret for this) and save it for the next step.

Now, login to iCL Portal as administrator and naviate to settings / Open ID: Microsoft Entra ID There, enter the client-id, tenant-id and client-secret that you copied in the previous step and click on save.

Display name: This will be shown to your users in the login screen, so you can set it to whatever you like. E.g. "Login with Azure Entra ID"

Additional scopes: lets you define additional scopes/claims that will be requested from Entra ID
Email/Name/Surname/Username Claim Type: allows you to override which claims are used for the respective property. Usually you do not need to touch this. That is only for advanced use cases By default, the e.g. username for any user coming from Azure Entra ID is derived from the users e-mail address. The reason is that this claim is always present and unique. If you would like to use the value of some other claim as username, you can define it using the Name Claim Type setting.
The claim is optionalAs opposed to the `External ID Claim Type**, even when this option is enabled, the presence of the defined claim is optional. If a user authenticates and the corresponding token does not contain a suitable claim, the system falls back to using the e-mail address of the user to create a unique username.
External ID Claim Type: Use this if you wan to define a custom claim that is used as reference/externalid for the user. It can be used to map an existing AD claim to the
ExternalId/Referenceof a user. In most cases, the default value (http://schemas.microsoft.com/identity/claims/objectidentifier) will be the best choice. It maps the users Object ID of the Active Directory user, to the field Reference of the iCL Portal user: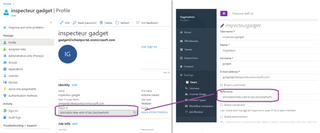 If enabled, the defined claim is required
When this option is enabled, every user token must contain this claim. Otherwise the authentication fails.
noteYou can use this to create users in iCL Portal upfront and assign them to teams or give them global roles. Once the user logs in with their Azure Entra ID account, they will take over the iCL Portal user. The easier solution, though, is just enabling the setting Match users by e-mail
Please be aware, however, that the properties of the AD user (first name, last name, …) will not be automatically applied to the iCL Portal user. To enable this behavior, you will have to set the setting
ADFS_UpdateLocalUserPropertiesto true. With this, every time an AD user logs in, his/her AD properties (e-mail, first name and last name) are re-applied to the iCL Portal user.Match users by e-mail: if disabled and a local user is found that has the same e-mail address, the system returns an error. If enabled, it allows the user to "take over" the existing user profile. (this should be the default)
Implicitly register users: if enabled and the user does not yet exist locally, a local user account will be created and the default roles assigned
Default roles: The roles that will be given to a new implicitly registered user
Update user properties: If enabled, whenever a user logs in from Entra ID, the properties (first name, last name, e-mail) will be updated to the values provided by Entra ID. This is especially useful if you have enabled implicit registration and want to ensure that the user properties are always up to date with the values in Entra ID.
Set the NLog log level to Info to see the claims provided
A login attempt will be logged with all provided claims
2024-05-16 13:54:07.0207|log:iCL.Portal.Controllers.AccountApiController|thr:54|DEBUG|usr:|ten:|External login with claims from https://sts.windows.net/0585ddbb-4b3c-407a-a707-b0bf65fa71eb/:
http://schemas.xmlsoap.org/ws/2005/05/identity/claims/nameidentifier:3nzHVNNP4Dx84nZ6Bttx1vtYLhVPQxG5NxdRjtLQbek
http://schemas.microsoft.com/identity/claims/tenantid:0585ddbb-4b3c-407a-a707-b0bf65fa71eb
http://schemas.microsoft.com/identity/claims/objectidentifier:85416830-f49e-43bf-87a8-204284ef5df3
http://schemas.xmlsoap.org/ws/2005/05/identity/claims/name:gadget@icltestportal.onmicrosoft.com
http://schemas.xmlsoap.org/ws/2005/05/identity/claims/surname:Gadgetto
http://schemas.xmlsoap.org/ws/2005/05/identity/claims/givenname:Antoine Gerald
http://schemas.microsoft.com/identity/claims/displayname:inspecteur gadget
http://schemas.microsoft.com/identity/claims/extn.METAID:48049BA322B3526D6XXX
http://schemas.microsoft.com/identity/claims/identityprovider:https://sts.windows.net/0585ddbb-4b3c-407a-a707-b0bf65fa71eb/
http://schemas.microsoft.com/claims/authnmethodsreferences:http://schemas.microsoft.com/ws/2008/06/identity/authenticationmethod/password
http://schemas.microsoft.com/claims/authnmethodsreferences:http://schemas.microsoft.com/claims/multipleauthn
http://schemas.microsoft.com/ws/2008/06/identity/claims/authenticationmethod:urn:oasis:names:tc:SAML:2.0:ac:classes:Password
http://schemas.microsoft.com/ws/2008/06/identity/claims/authenticationinstant:2024-05-16T13:52:44.984Z
http://schemas.xmlsoap.org/ws/2005/05/identity/claims/emailaddress:gadget@icltestportal.onmicrosoft.com
Directly after, you will see if the defined ADFS_UserNameClaimType found.
- No suitable claim found:
2024-05-16 13:54:07.0207|log:iCL.Portal.Controllers.AccountApiController|thr:54|INFO|usr:|ten:|Custom 'UserNameClaimType' http://some.random.non-existent.claim.type was provided, but was not present in the token. Falling back to e-mail.
- Suitable claim found, but not updating existing users username
2024-05-16 13:54:07.0207|log:iCL.Portal.Controllers.AccountApiController|thr:108|INFO|usr:|ten:|[ADFS_ImplicitlyRegister] Custom 'UserNameClaimType' http://schemas.xmlsoap.org/ws/2005/05/identity/claims/surname was provided and found in token: 'mmuller' will be used as username
- Suitable claim found and
ADFS_UpdateLocalUserPropertiesactivated -> The username is updated
2024-05-16 13:54:07.0207|log:iCL.Portal.Controllers.AccountApiController|thr:108|INFO|usr:|ten:|[ADFS_ImplicitlyRegister] Custom 'UserNameClaimType' http://schemas.xmlsoap.org/ws/2005/05/identity/claims/surname was provided and found in token: 'mmuller' will be used as username
2024-05-16 13:54:08.9106|log:iCL.Portal.Controllers.AccountApiController|thr:108|INFO|usr:|ten:1|[ADFS_UpdateLocalUserProperties] Custom 'UserNameClaimType' http://schemas.xmlsoap.org/ws/2005/05/identity/claims/surname was provided and found in token: 'mmuller' will be used as username
2.4.2 Required claims
As already noted, when the users login using an external authentication provider, iCL Portal implicitly creates a local user profile for them which can then be used by local iCL Portal administrators in order to assign roles to them or make them members of a team. To create users, a minimal set of claims has to be provided by the authentication provider. These three claims are:
- http://schemas.xmlsoap.org/ws/2005/05/identity/claims/emailaddress which will be used as username as well as as his/her email address.
- http://schemas.xmlsoap.org/ws/2005/05/identity/claims/givenname which will be set as the users first name
- http://schemas.xmlsoap.org/ws/2005/05/identity/claims/surname which will be set as the users last name
If these are not present, the user will not be able to login.
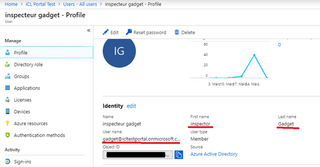
As for Azure Entra ID, these are the properties of a user that have to be set:
2.5 Installing the dox42 host
iCL Portal generates dox42-based reports in a separate Windows service (iCLPortalDox42) so that long-running report jobs do not impact the web front-end. The service shares the same SQL Server database as iCL Portal (for Hangfire job dispatch).
2.5.1 Install
- Extract the shipped
Dox42Host v{version}.zippackage into the folder it should be installed to (for exampleC:\Program Files\iCLPortalDox42). - Double-click
install.bat— the script self-elevates (UAC prompt) if it's not already running elevated. It installs the Windows serviceiCLPortalDox42with--autostartand then launches the configuration wizard (config.bat) automatically. - When the configuration wizard appears, supply:
- Default SQL connection string — must point to the same database used by iCL Portal (shared Hangfire tables).
- Storage connection string — leave empty to use the local file system / file share, or paste an Azure Blob Storage connection string to use Azure Blob Storage.
- Service account —
NT AUTHORITY\NetworkService(default) or a domain/local account with SQL Server access. The wizard validates and resolves the account name. - Storage root folder (NodeRoot) — temp folder used to extract ICLR files; leave empty for the default
{install}\bin\app_data. - Application Insights iKey, customer tag, environment tag (e.g. Dev/Test/Prod). Provide the same values as in the web front-end to correlate logs and telemetry.
- Log folder — absolute path or
${basedir}/logsto resolve relative to the install folder.
- The wizard writes the values into
bin\iCL.Portal.Reporting.Dox42.Host.exe.configandbin\NLog.config, applies the service logon account viasc config, and offers to (re)start the service.
2.5.2 Change configuration later
Run config.bat from the install folder any time to re-configure the service. Existing values are shown in brackets and kept on ENTER without typing anything.
For deeper topics (storage modes, portal Settings > dox42 reference, troubleshooting) refer to the README.md that ships in the dox42 host package alongside the scripts.
3 Installing icl portal (multi server)
For a multi server scenario, you will have to create another virtual machine and follow the instructions from 2. Note, that you can add additional front-ends any time, as long as the load balancer supports this. Hint: When it comes to the web.config, you should be able to simply copy it from the first web front-end and use it on the second machine. There are several additional steps required: setting up the load balancer and setting up redis.
3.1 Setting up the load balancer
Any third party load balancer can be used in this scenario, therefore, the setup is out of scope of this manual. Note, however, that no special routing – like sticky routing – is required, as the iCL Portal web front-ends store their state in the distributed cache.
3.2 Setting up the distributed cache (Redis)
The distributed cache is the short-time memory of the web front-ends and, thus, must be within the same subnet and have a fast ethernet connection. Also, it is strongly recommended to run the redis cache on a separate machine. Note, that the makers of redis strongly recommended to run redis on Linux (such as Ubuntu). You can find detailed instructions here . However, Microsoft also maintains a windows port of Redis, which can be found here. As it is easier to setup, this documentation will show you how to run the windows version of redis.
3.2.1 Setting up Redis on Windows
First, download the latest release of Redis from https://github.com/MicrosoftArchive/redis/releases (every version from 3.0 is supported). At the time of this writing, this is version 3.0.504. Download the Redis-x64-x.x.xxx.msi package

Finally, make sure that you configure an inbound firewall rule on port 6379
Note, that you can additionally strengthen the security of redis, by only allowing inbound connections from the IP addresses of the iCL Portal web front-ends!
3.2.2 Configuring iCL Portal to use Redis
To instruct iCL portal to actually use Redis, open the Web.config file (Note that you will have to do this on each web front-end)
Add the following key Abp.Redis.Cache to the <connectionStrings> node
<connectionStrings>
<!-- connection string for mssql -->
<add name="Default" connectionString="…" />
<!-- connection string for redis -->
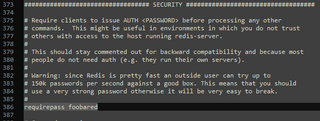
<add name="Abp.Redis.Cache" connectionString="192.168.178.101:6379,password=foobared,abortConnect=False"/>
</connectionStrings>
Note, that you have to enter the IP address of the virtual machine, which is running Redis - 192.168.178.101 is just a demo value!
Also, make sure that you use the password, that you configured in the previous step instead of foobared
Add the following <sessionState> node to the beginning of the <system.web> node
<system.web>
    <!-- command this out for using REDIS in a scale out scenario -->
    <sessionState mode="Custom" customProvider="iCL.Portal.SessionState.Redis">
      <providers>
        <add name="iCL.Portal.SessionState.Redis" type="Microsoft.Web.Redis.RedisSessionStateProvider"
             connectionString="Abp.Redis.Cache"
             applicationName="iCL.Portal.Session" />
      </providers>
    </sessionState>
...
</system.web>
And finally, change the <modules> node in <system.webServer> to contain the following two highlighted elements:
<system.webServer>
    <modules runAllManagedModulesForAllRequests="true">

      <!-- .Net462+ requires us to switch to a new session state module (see https://github.com/Azure/aspnet-redis-providers/issues/104) -->
      <remove name="Session" />
      <add name="Session"
           type="Microsoft.AspNet.SessionState.SessionStateModuleAsync, Microsoft.AspNet.SessionState.SessionStateModule, Version=1.1.0.0, Culture=neutral, PublicKeyToken=31bf3856ad364e35"
           preCondition="integratedMode" />

      <remove name="ApplicationInsightsWebTracking"/>
      <add name="ApplicationInsightsWebTracking" type="Microsoft.ApplicationInsights.Web.ApplicationInsightsHttpModule, Microsoft.AI.Web" preCondition="managedHandler"/>
    </modules>
    ...
Once you are finished with the configuration, save the Web.config. That will cause iCL Portal to restart. To make sure that the connection to Redis works, open the latest error.log file of iCL Portal. (If you did not change the NLog.config file, then these should be in <webroot>\App_Data\Logs)
If iCL Portal takes a very long time to start up and the error.log is filled with messages like StackExchange.Redis.RedisConnectionException: No connection is available to service this operation, then you need to go over your redis configuration once more!
4 Configuring the Microsoft Distributed Transactions Coordinator Service
In case your error log or any request to iCL Portal shows this exception:
System.Data.Entity.Core.Entityexception: The Underlying Provider Failed On Open. ---> System.Transactions.Transactionmanagercommunicationexception: Network Access For Distributed Transaction Manager (Msdtc) Has Been Disabled. Please Enable Dtc For Network Access In The Security Configuration For Msdtc Using The Component Services Administrative Tool. ---> System.Runtime.Interopservices.Comexception: The Transaction Manager Has Disabled Its Support For Remote/Network Transactions. (Exception From Hresult: 0x8004d024)
To resolve this issue, you need to configure DTC access on all machines, that participate in coordinating distributed transactions. For iCL Portal, this is
- Every machine running the web application
- The database server
4.1.1 Solution part 1
- Enable network access.
- Open the server the web-frontend runs on (iCL Portal website)
- Open Server Manager => Tools => Component Services

- Alternatively, you can press the Windows button and search for
dcomcnfg
- Expand Component Services => Computers => My Computer => Distributed Transaction Coordinator and then open its Properties view from the context menu

- In the Security tab, enable Network DTC Access
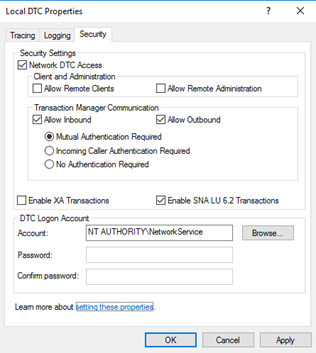
4.1.2 Solution part 2
Enable Firewall Exceptions for MS DTC
Where Windows Firewall is in use, you must add a firewall exception for the Microsoft Distributed Transaction Coordinator (MS DTC) at each computer that participates in coordinating distributed transactions. To configure this change, use Windows Firewall in Control Panel to enable a firewall exception at each computer in the network running DTCs that require network connectivity.
Membership in Administrators, or equivalent, is the minimum required to complete this procedure. Review details about using the appropriate accounts and group memberships at Local and Domain Default Groups
- Open Windows Firewall. To open Windows Firewall, on the Start menu, click Control Panel. In Control Panel, do one of the following:
a. Under Security,
click Allow a program through Windows Firewall.
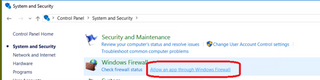
b. If Control Panel is in Classic view, click Windows Firewall.
- On the Exceptions tab, select the Distributed Transaction Coordinator check box.

- On the Exceptions tab, select the Distributed Transaction Coordinator check box.
- Click OK.